Thomson 585 - how to check or change advanced settings
How to find and configure your router's advanced settings.
Open your web browser (This could be Internet Explorer, Safari or Firefox, depending on your system).
Ignore the website (or error message) that appears and enter the IP address of your router. This will be 192.168.1.254 unless you've changed it.

If you're asked to log in, enter the Router Username and Password (I don't know what these are).
You'll see your router homepage. Click Toolbox on the left menu.

On the right side of the screen you'll see the 6 available features. Click the links below to find out more:
This allows you to check and change your router settings from anywhere on the Internet.

There are two modes to choose from:
- Permanent Mode - Remote Assistance will be switched off on the next reboot
- Temporary Mode - Remove Assistance will be switched off if it's not used for 20 minutes or after a reboot
To use remote access, you'd need to browse to the URL (note this change at times if you have a dynamic IP) and enter the Username and Password shown on this page.
To switch the service on click Enable Remote Assistance.
Your router includes a basic firewall. By default the security level is set to Standard mode. This will block incoming connections unless they are defined in Games and Application sharing. All outbound traffic is allowed.
You can change the security level, switch the firewall off or create your own custom security profiles by clicking Configure.

Dynamic DNS lets you point a fixed domain at your broadband connection when your connection uses a dynamic IP (you would normally need a static IP to do this). You'll need to be signed up to a Dynamic DNS provider such as http://www.dyndns.com/ to use it.
Once you've signed up for a Dynamic DNS service, click the Configure link.

Your Dynamic DNS provider will supply the details you need to use here. Use the Enabled tick box to switch the service on and off as you need it.

This is where you can set up port-forwarding and control UPnP. Current port forwarding rules will be shown under Game or Application near the bottom of the page.
Use the task list at the bottom to edit entries or add new ones.

To set up port forwarding for an application:
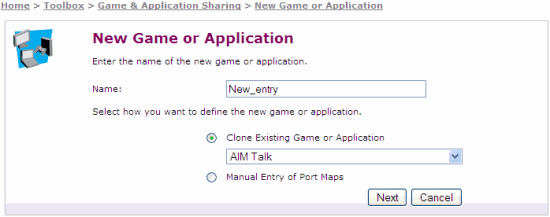
Click Create a new game or application at the bottom of the page.
Give your new rule a Name. You can use anything you like but it's generally a good idea to use a name that relates to the program the rule will apply to.
Make sure Manual Entry of Port Maps is selected and click Next.

Enter the port and protocol information for your application here and click Add.
If you need to add further rules you can do so now, otherwise click the Apply button further up the page.

Now you'll be back at the Game & Application Sharing menu. The final step is to tell your router which of your connected devices the rule should apply to.
Click Assign a game or application to a local network device.
Find the new rule you created in the Game or Application drop down box.
Use the Device box to choose the device this rule will apply to (This box contains a list of the computers that are visible on your network).
Finally click Add to apply the rule.

That's all you need to do, the port forward rule you've created will apply immediately.
The Protected Intrusions table is a log which shows you how many times a number of known intrusion methods have been blocked.
These figures will reset each time you restart your router.

Each account shown here can log in to your router with their own username and password. By default there'll be one user, named either Administrator or admin (depending on when you got your router).
Here you can change passwords, add or remove users and decide which account is the 'default user'.
Click configure or choose an option from the task list to begin.


More ways to get help

Plusnet community
Our customers always have tips to share.
Talk to our community

Sign Language service
Contact us using British Sign Language

My Account
Manage your bills, packages and details.
Sign into Broadband


